装机吧 - 系统装机大师 最简单易用的系统重装工具,让我们一起装机吧!支持 Windows XP、7、8、 10 原版镜像安装。支持 U 盘 PE 制作、PE 联网等多种功能选择。
  • 立即下载
  • 已下载:1000000+
    版本:12.6.48.1900 | 大小:31MB
当前位置:首页 > u盘教程
您的位置:首页 > u盘教程
Warning: Use of undefined constant title - assumed 'title' (this will throw an Error in a future version of PHP) in /data/www.zhuangjiba.com/web/e/data/tmp/tempnews8.php on line 170 教你mac如何安装windows系统
装机吧 Warning: Use of undefined constant newstime - assumed 'newstime' (this will throw an Error in a future version of PHP) in /data/www.zhuangjiba.com/web/e/data/tmp/tempnews8.php on line 171 2021年09月02日 09:50:00

  现在市面上除了windows操作系统外还有个苹果mac os 操作系统,我们都知道苹果电脑上都是装的mac os 操作系统,有些用户可能会用不习惯,就想把mac os操作系统换成windows系统,接下来小编给大家分享下mac上安装windows系统教程如何操作。

  mac如何安装windows系统方法如下:

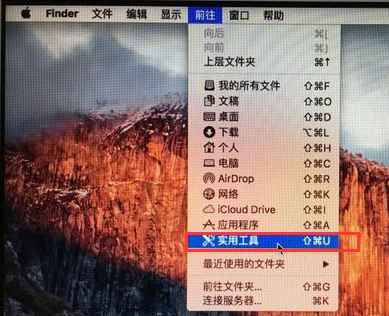
  1.首先我们下载好需要安装的系统镜像文件,然后我们打开苹果电脑点击上方任务栏的“前往”,点击“实用工具”。

image.png

  2.我们在实用工具中打开“boot camp".

image.png

  3.打开”boot camp助理“后,弹出窗口我们点击右下角的”继续“。

image.png

  4.ISO映像这边,点击”选取“,选择windows10 iso文件位置,windows10原版iso镜像要事先下好,选好之后,点击打开。

image.png

  5.接着是分区,分出来一个区给windows系统,用鼠标拖动中间小圆点划分两个分区的大小,一般需要30G以上,具体看你的硬盘大小,分区之后,点击安装。

image.png

  6.这时候”Boot Camp助理“会下载windows支持软件,执行磁盘分区操作,预计时间可能15-20分钟。

image.png

  7.等待进度条完成。

image.png

  8.然后会启动进入windows安装程序。

image.png

  9.安装语言、时间、键盘不用改,点击"下一步".

image.png

  10.密钥这边,直接点击"我没有产品密钥"。

image.png

  11.选择要安装的win10版本,选择之后,右下角点击”下一步“。

image.png

  12.之后选中”BOOTCAMP“这个分区,记住它的分区编号是分区5,点击”格式化“按钮。

image.png

  13.格式化之后,继续选中这个分区5,点击”下一步“。

image.png

  14.开始安装windows10系统,等待即可。

image.png

  15.经过一段时间安装之后,安装完成,可以选择自定义,也可以使用快速设置。

image.png

  16.进入win10系统之后首先要先安装驱动,点击左下角的资源管理器图标。

image.png

  17.打开之后,点击红色圈的这个盘进入。

image.png

  18.找到BootCamp文件夹,双击打开。

image.png

  19.运行Setup,打开Boot Camp安装程序,执行驱动安装。

image.png

  20.驱动安装完毕后,点击是,立即重启系统,windows操作系统就安装完成,重启之后就能使用啦。

image.png

  以上就是mac如何安装windows系统的内容,希望能帮助到大家。

喜欢22
标签:
mac如何安装windows系统电脑基础知识mac上安装windows系统教程
热门搜索
相关视频
装机吧在线重装 Window 11 教程
装机吧在线重装 Window 10 教程
猜你喜欢
tp-link无线网卡驱动制作图文详解..
2017-11-30
装机吧u盘系统盘制作方法
2021-01-12
详解mx250显卡什么级别能玩什么游戏..
2021-11-07
怎么用u盘启动winpe呢?
2017-07-20
u盘无法格式化应该怎么办
2021-05-28
华硕h61主板参数是什么
2021-02-13

教你mac如何安装windows系统

分类:u盘教程    发布时间: 2021年09月02日 09:50:00
播放 Warning: Use of undefined constant newstime - assumed 'newstime' (this will throw an Error in a future version of PHP) in /data/www.zhuangjiba.com/web/e/data/tmp/tempnews8.php on line 423 2021年09月02日 09:50:00
现在市面上除了windows操作系统外还有个苹果mac os 操作系统,我们都知道苹果电脑上都是装的mac os 操作系统,有些用户可能会用不习惯,就想把mac os操作系统换成windows系统,那么mac如何安装windows系统呢?下面小编把mac上安装windows系统教程分享给大家,我们一起来看看吧.

  现在市面上除了windows操作系统外还有个苹果mac os 操作系统,我们都知道苹果电脑上都是装的mac os 操作系统,有些用户可能会用不习惯,就想把mac os操作系统换成windows系统,接下来小编给大家分享下mac上安装windows系统教程如何操作。

  mac如何安装windows系统方法如下:

  1.首先我们下载好需要安装的系统镜像文件,然后我们打开苹果电脑点击上方任务栏的“前往”,点击“实用工具”。

image.png

  2.我们在实用工具中打开“boot camp".

image.png

  3.打开”boot camp助理“后,弹出窗口我们点击右下角的”继续“。

image.png

  4.ISO映像这边,点击”选取“,选择windows10 iso文件位置,windows10原版iso镜像要事先下好,选好之后,点击打开。

image.png

  5.接着是分区,分出来一个区给windows系统,用鼠标拖动中间小圆点划分两个分区的大小,一般需要30G以上,具体看你的硬盘大小,分区之后,点击安装。

image.png

  6.这时候”Boot Camp助理“会下载windows支持软件,执行磁盘分区操作,预计时间可能15-20分钟。

image.png

  7.等待进度条完成。

image.png

  8.然后会启动进入windows安装程序。

image.png

  9.安装语言、时间、键盘不用改,点击"下一步".

image.png

  10.密钥这边,直接点击"我没有产品密钥"。

image.png

  11.选择要安装的win10版本,选择之后,右下角点击”下一步“。

image.png

  12.之后选中”BOOTCAMP“这个分区,记住它的分区编号是分区5,点击”格式化“按钮。

image.png

  13.格式化之后,继续选中这个分区5,点击”下一步“。

image.png

  14.开始安装windows10系统,等待即可。

image.png

  15.经过一段时间安装之后,安装完成,可以选择自定义,也可以使用快速设置。

image.png

  16.进入win10系统之后首先要先安装驱动,点击左下角的资源管理器图标。

image.png

  17.打开之后,点击红色圈的这个盘进入。

image.png

  18.找到BootCamp文件夹,双击打开。

image.png

  19.运行Setup,打开Boot Camp安装程序,执行驱动安装。

image.png

  20.驱动安装完毕后,点击是,立即重启系统,windows操作系统就安装完成,重启之后就能使用啦。

image.png

  以上就是mac如何安装windows系统的内容,希望能帮助到大家。

上1一篇: Warning: Use of undefined constant classid - assumed 'classid' (this will throw an Error in a future version of PHP) in /data/www.zhuangjiba.com/web/e/data/tmp/tempnews8.php on line 503 Warning: Use of undefined constant tbname - assumed 'tbname' (this will throw an Error in a future version of PHP) in /data/www.zhuangjiba.com/web/e/data/tmp/tempnews8.php on line 503 Warning: Use of undefined constant id - assumed 'id' (this will throw an Error in a future version of PHP) in /data/www.zhuangjiba.com/web/e/data/tmp/tempnews8.php on line 504 Warning: Use of undefined constant title - assumed 'title' (this will throw an Error in a future version of PHP) in /data/www.zhuangjiba.com/web/e/data/tmp/tempnews8.php on line 509 手把手教你u盘做系统详细步骤 下一篇: Warning: Use of undefined constant classid - assumed 'classid' (this will throw an Error in a future version of PHP) in /data/www.zhuangjiba.com/web/e/data/tmp/tempnews8.php on line 514 Warning: Use of undefined constant tbname - assumed 'tbname' (this will throw an Error in a future version of PHP) in /data/www.zhuangjiba.com/web/e/data/tmp/tempnews8.php on line 514 Warning: Use of undefined constant id - assumed 'id' (this will throw an Error in a future version of PHP) in /data/www.zhuangjiba.com/web/e/data/tmp/tempnews8.php on line 515 Warning: Use of undefined constant title - assumed 'title' (this will throw an Error in a future version of PHP) in /data/www.zhuangjiba.com/web/e/data/tmp/tempnews8.php on line 520 gpuz怎么提取显卡rom的详细教程
栏目:u盘教程 阅读: 2019-05-29
栏目:u盘教程 阅读: 2019-05-27
视频教程 更多>>
重装系统 更多>>
win10 更多>>
win7 更多>>
win8 更多>>