Warning: Use of undefined constant title - assumed 'title' (this will throw an Error in a future version of PHP) in /data/www.zhuangjiba.com/web/e/data/tmp/tempnews8.php on line 170
了解电脑公司XP系统下载安装教程
装机吧
Warning: Use of undefined constant newstime - assumed 'newstime' (this will throw an Error in a future version of PHP) in /data/www.zhuangjiba.com/web/e/data/tmp/tempnews8.php on line 171
2021年03月29日 09:36:00
电脑公司WinXP系统稳定,上网速度更快,保留系统常用服务,直接支持局域网共享、无线网络、打印机功能等,首次登陆桌面,自动判断和执行清理目标机器残留病毒信息,杜绝病毒残留,自动清除启动项:显卡启动项,声卡启动项只运行一次,这么好的系统,下面小编就跟大家说说要电脑公司xp系统怎么下载。
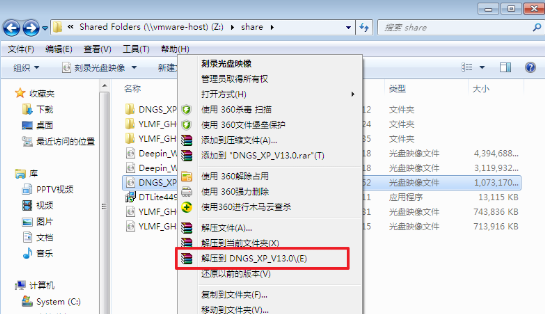
1、把下载好的电脑xp系统iso镜像文件解压出来。
2、打开解压好的文件,打开里面的AUTORUN.EXE程序文件。

3、选择“安装系统到C盘”。

4、在出现的Ghost安装器界面中,选择映像文件的路径,点击执行。

5、执行后就开始了电脑公司xp系统的自动安装。

6、启动重启后,出现以下界面就好啦。

以上就是电脑公司xp系统安装的详细教程啦,希望能帮助到大家。
喜欢22


