Warning: Use of undefined constant title - assumed 'title' (this will throw an Error in a future version of PHP) in /data/www.zhuangjiba.com/web/e/data/tmp/tempnews8.php on line 170
win10文件共享及权限设置的具体步骤
装机吧
Warning: Use of undefined constant newstime - assumed 'newstime' (this will throw an Error in a future version of PHP) in /data/www.zhuangjiba.com/web/e/data/tmp/tempnews8.php on line 171
2021年03月18日 18:30:00
在工作中,很多用户为了同事之间比较方便查看文件等资料。都会设置文件共享。但是为了保护服务器共享文件的安全,我们需要设置不同用户访问共享文件的不同权限,很多用户不知道win10文件共享及权限怎么设置,那么今天小编就带大家来看一看win10文件共享及权限设置的具体步骤。
win10文件共享及权限设置的具体步骤:
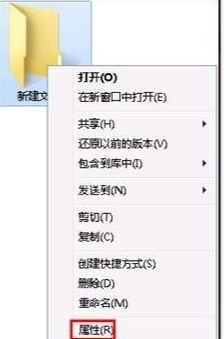
1、右击我们想要共享的文件选择属性。
2、选择共享再点击高级共享。

3、勾选共享此文件夹,点击权限。

4、选择”更改“权限,随后点击确定即可。这样就完成了共享文件夹啦!

以上就是win10文件共享及权限怎么设置的具体步骤啦!更多教程尽在装机吧官网哦!
喜欢22


