Warning: Use of undefined constant title - assumed 'title' (this will throw an Error in a future version of PHP) in /data/www.zhuangjiba.com/web/e/data/tmp/tempnews8.php on line 170
win7系统还原点怎么创建
装机吧
Warning: Use of undefined constant newstime - assumed 'newstime' (this will throw an Error in a future version of PHP) in /data/www.zhuangjiba.com/web/e/data/tmp/tempnews8.php on line 171
2022年05月16日 09:06:02

如果想要给win7系统还原到某个时间段的系统状态的话,我们就需要实现创建好win7系统还原点。有网友不清楚win7系统还原点怎么创建,下面小编就教下大家创建win7系统还原点的操作方法。
工具/原料:
系统版本:windows7系统
品牌型号:联想ThinkPad13
方法/步骤:
创建win7还原点的步骤图解:
1、在桌面上鼠标右键点击计算机,选择属性;
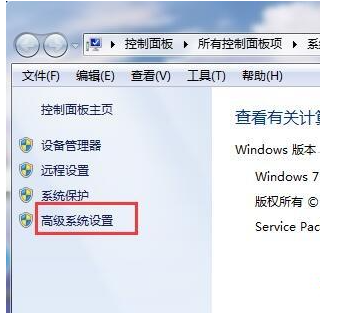
2、在左侧窗口中点击高级系统设置;
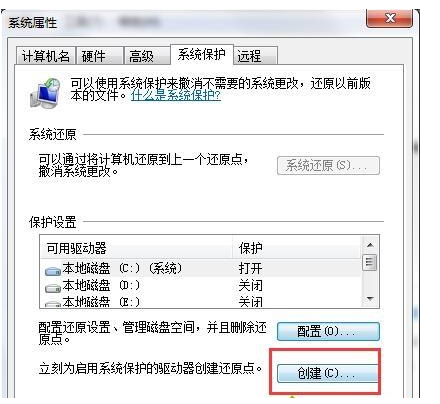
3、然后在系统属性界面中,选择系统保护标签,点击配置;

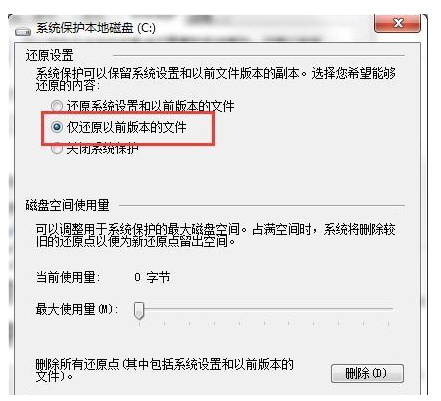
4、在下面这个窗口中,点击仅还原以前版本的文件,然后点击确定即可;
5、接着回到系统属性窗口中,点击创建还原点,然后根据向导提示操作完成即可。
总结:以上就是小编带来的win7系统怎么设置还原点详细图解的全部内容,希望可以提供帮助。
喜欢22


