Warning: Use of undefined constant title - assumed 'title' (this will throw an Error in a future version of PHP) in /data/www.zhuangjiba.com/web/e/data/tmp/tempnews8.php on line 170
windows7电脑上连接wifi的设置步骤解说
装机吧
Warning: Use of undefined constant newstime - assumed 'newstime' (this will throw an Error in a future version of PHP) in /data/www.zhuangjiba.com/web/e/data/tmp/tempnews8.php on line 171
2021年04月13日 08:33:00
Windows7是现在部分家庭使用的操作系统之一。现在很多家庭也都覆盖了WiFi。有些使用Windows7系统的朋友就想在电脑上连接WiFi。下面,我就给大家介绍一下Windows7电脑上连接WiFi的设置步骤。大家快来学习一下吧。
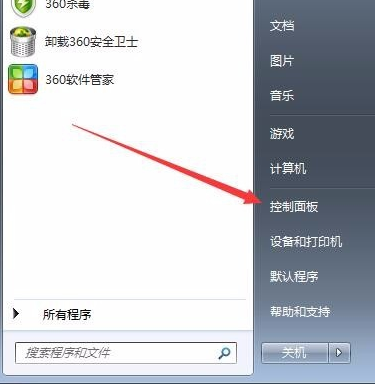
1、在设置WiFi连接之前需要确保电脑上安装了无线网卡并安装好了驱动程序。然后在开始菜单中打开控制面板。
2、选择网络和Internet

3、点击网络和共享中心

4、接着点击更改网络设置下方的“设置新的连接或网络”

5、选择“设置无线临时网络”

6、弹出设置临时网络窗口,根据向导提示操作,下一步

7、根据自己喜好设置网络名和安全秘钥,点击下一步就设置完成啦。

以上就是windows7电脑连上wifi的详细步骤啦,希望能帮助到大家。
喜欢22


