Warning: Use of undefined constant title - assumed 'title' (this will throw an Error in a future version of PHP) in /data/www.zhuangjiba.com/web/e/data/tmp/tempnews1.php on line 152 macbookpro安装win11教程
- 分类:win11 发布时间: Warning: Use of undefined constant newstime - assumed 'newstime' (this will throw an Error in a future version of PHP) in /data/www.zhuangjiba.com/web/e/data/tmp/tempnews1.php on line 156 2021年12月23日 13:41:00
作为今年第四季度才发行的最新windows 11系统,得到不少人的关注,很多使用苹果系统的朋友也想体验。那么苹果电脑怎么装win11系统?下面就来看看macbookpro安装win11教程。
苹果双系统Win11安装前准备工作:
1、备份好苹果电脑中的重要资料,避免在安装中导致丢失。
2、准备一个 8GB 以上的空白 U 盘,u盘如果有文件的先备份好。
3、下载好驱动精灵网卡版安装包和360驱动大师网卡版安装包,用于安装网卡驱动。
4、准备苹果Windows 驱动包,1 GB 左右。(百度网盘下载:链接: https://pan.baidu.com/s/1_BpQrVToAKylu1TxYkZi8g 提取码: 8fwm)
步骤一:制作win11系统u盘启动盘
1、在苹果电脑上安装好小白一键重装系统软件,然后插入空白u盘,关闭电脑上的安全杀毒软件等。打开软件后选择制作系统,点击开始制作。
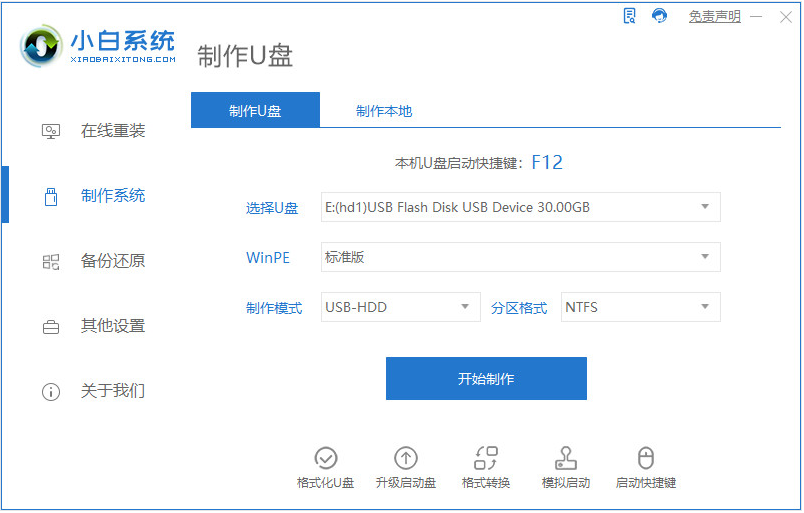
2、选择需要安装的win11系统,点击开始制作启动盘。

3、等待win11启动盘制作完成后,退出u盘。
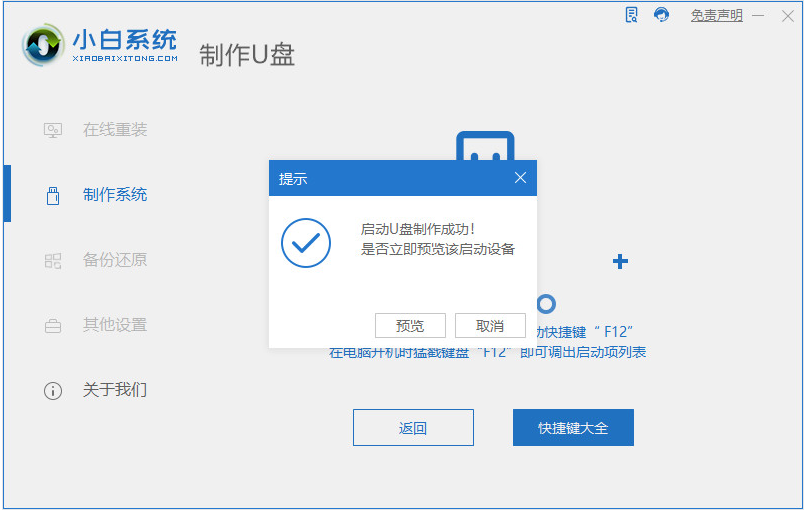
4、注意:退出u盘前,将下载好的苹果Windows驱动包和驱动精灵网卡版以及360驱动大师复制到U盘路径上。
步骤二:对Mac硬盘增加Windows分区操作
1、由于 MacOS 系统版本不同,我们只需要在苹果系统中找到磁盘工具,然后在电脑硬盘增加一个新的 Windows 11 安装分区。
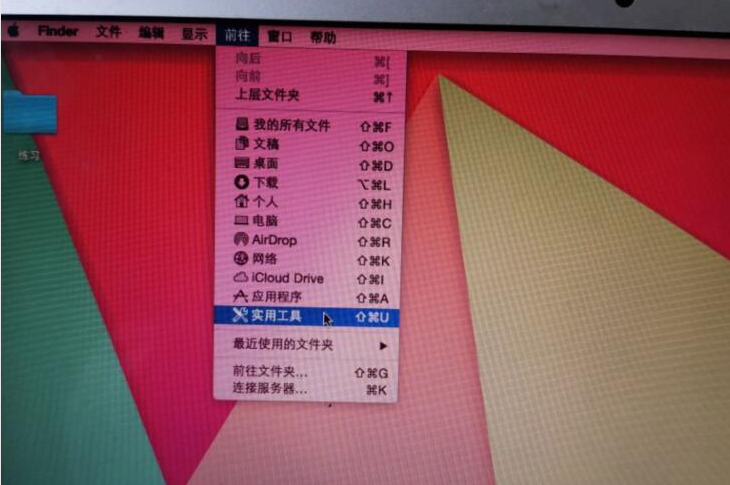

2、分区完成后,关机苹果电脑即可。
步骤三:设置U盘启动进入PE系统并安装win11
1、插上制作好的启动 U 盘,MacBook电脑开机的时候按住 Option 键不放,当出现苹果 Logo 时松开。

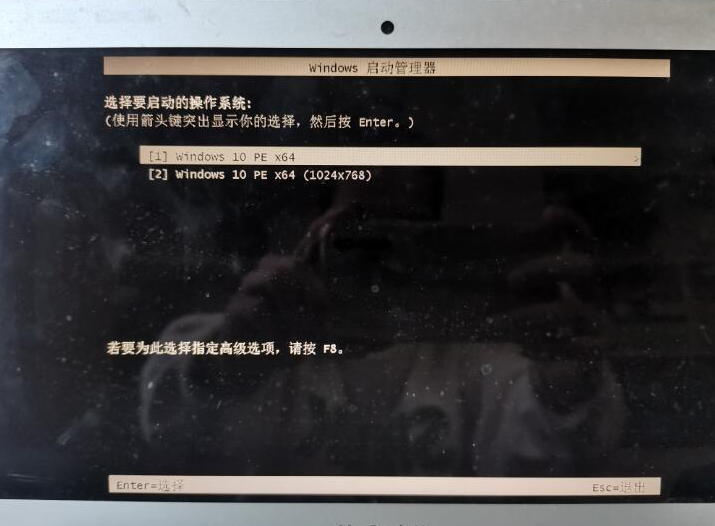
2、在引导界面中选择小白 PE 系统进入。

3、选择第一个pe系统回车进入。
4、进入pe系统后,打开桌面上的分区工具(DiskGenius),把之前扩展的分区格式化处理。

5、分区完成后保存设置退出,然后打开pe桌面上的小白装机工具,选择需要安装的win11系统点击安装。
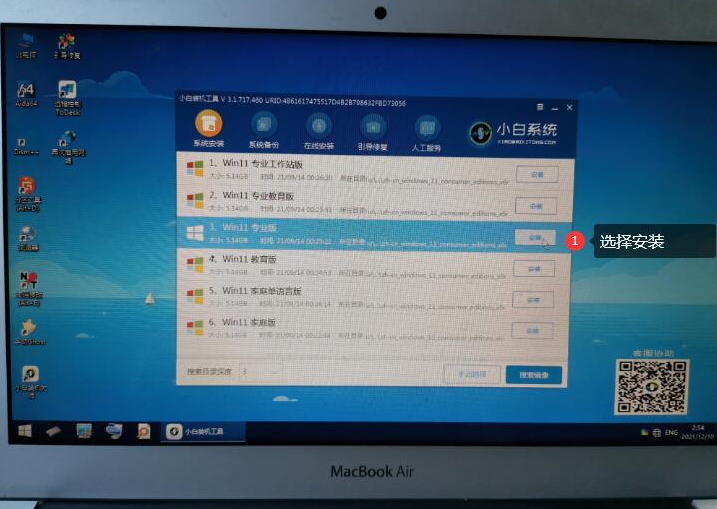
6、安装完成后退出U盘,重启电脑。
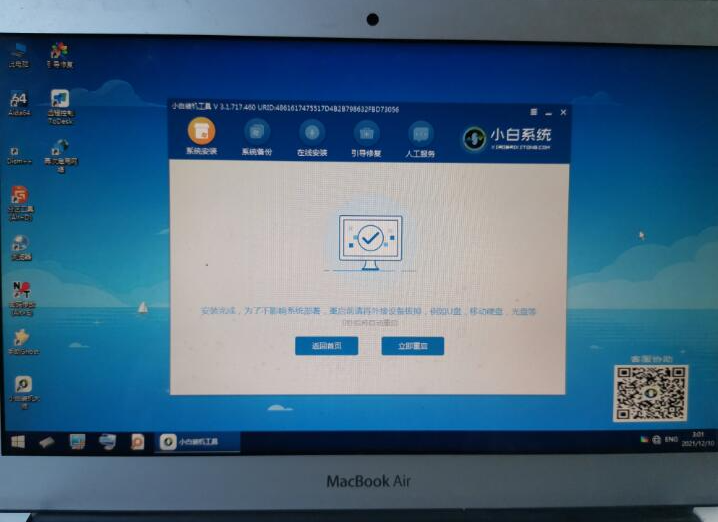
7、重启后开机再按住 Option 键不放,在这里就可以看到双启动菜单,选择Win11系统进入。


8、win11系统正在部署安装中。
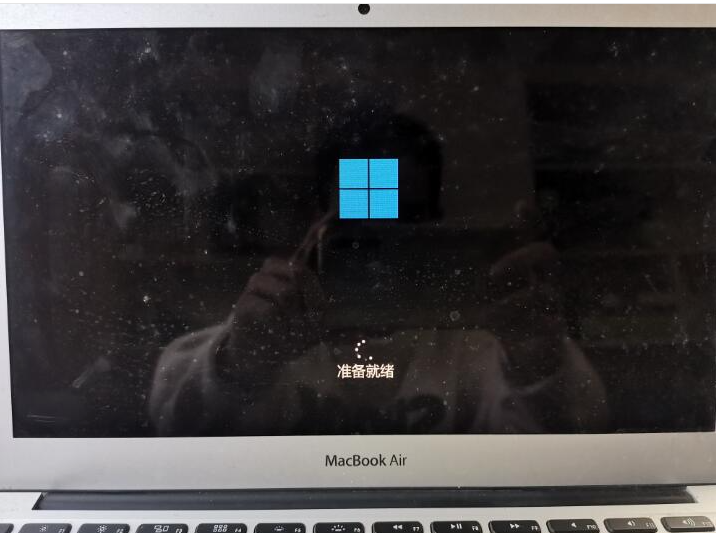
步骤四:更新Windows11网卡以及电脑相关驱动。
1、等到正常进入到Win11系统后可能电脑可能无法联网,这个时候插上U盘,把下载备用的驱动精灵网卡版和驱动人生网卡版以及苹果 Windows 驱动包拷贝到电脑中。安装驱动精灵网卡版更新驱动,然后正常联网并更新相关驱动。

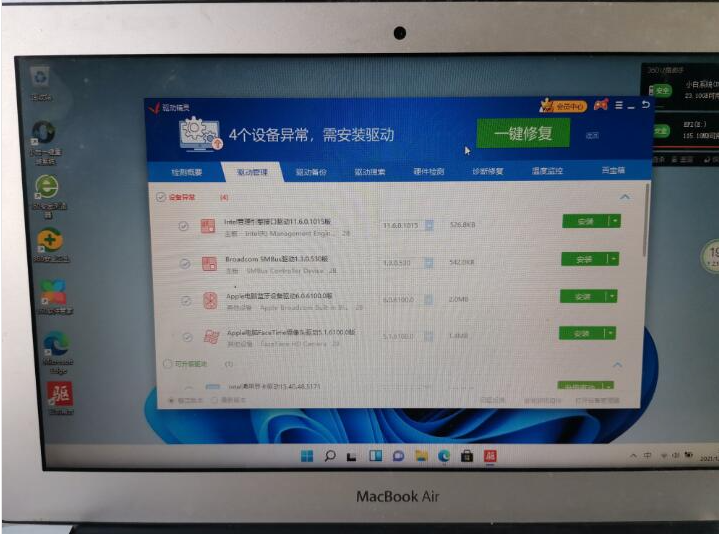
2、驱动精灵更新完后可以直接卸载掉,再安装360驱动大师更新电脑中需要更新的驱动。一款驱动工具并不能完整检测到所需要的驱动,所以需要再次检测更新即可。
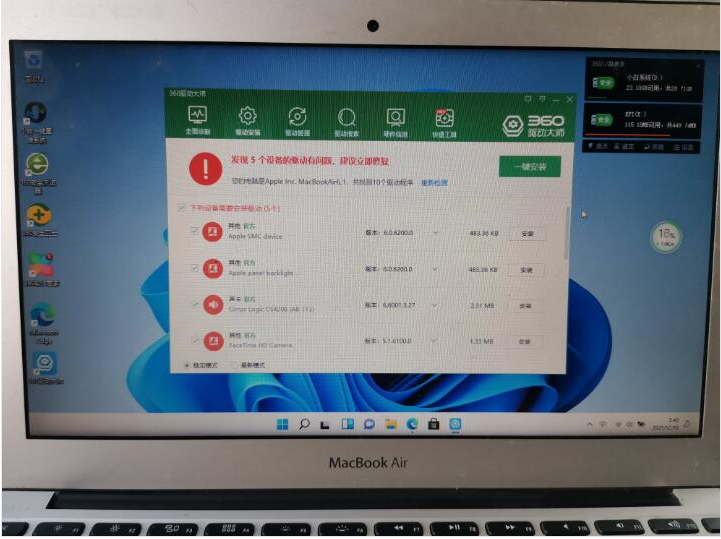
3、驱动更新完成后,触摸板和 Windows 右键可能无法使用,这时候需要下载个WinRAR或者7-Zip工具,把苹果 Windows 驱动包解压出来,在 BootCamp 文件夹中找到 Setup.exe 直接默认安装即可。安装完成后直接重启电脑。
重启后在右下角托盘中找到 Boot Camp 并打开,在触控板中勾选的辅助单击即可。这时候触摸板和右键菜单应该就可以正常使用了。

4、这样驱动打完后,win11系统就可以正常使用了。我们也可以在 Boot Camp 中更改开机启动系统,这样就不用再开机时手动选择需要启动的系统了。

以上便是苹果macbookpro安装win11教程,有不懂的小伙伴可以参照教程操作。
猜您喜欢
- 屏幕亮度怎么调win11系统调节方法..2022/04/07
- 重装windows11系统教程2022/06/29
- macbookair安装win11系统的教程..2022/02/15
- win11正式版怎么安装使用2022/08/16
- win11任务栏图标消失的解决教程..2022/01/30
- 放弃升级Win11:深入解析潜在问题与解决..2024/08/22
相关推荐
-
Warning: Use of undefined constant islast - assumed 'islast' (this will throw an Error in a future version of PHP) in /data/www.zhuangjiba.com/web/e/class/t_functions.php on line 296
Warning: Use of undefined constant tbname - assumed 'tbname' (this will throw an Error in a future version of PHP) in /data/www.zhuangjiba.com/web/e/class/t_functions.php on line 305
Warning: Use of undefined constant modid - assumed 'modid' (this will throw an Error in a future version of PHP) in /data/www.zhuangjiba.com/web/e/class/t_functions.php on line 306
Warning: Use of undefined constant yhid - assumed 'yhid' (this will throw an Error in a future version of PHP) in /data/www.zhuangjiba.com/web/e/class/t_functions.php on line 307
Warning: Use of undefined constant classid - assumed 'classid' (this will throw an Error in a future version of PHP) in /data/www.zhuangjiba.com/web/e/class/t_functions.php on line 673
Warning: Use of undefined constant bname - assumed 'bname' (this will throw an Error in a future version of PHP) in /data/www.zhuangjiba.com/web/e/class/t_functions.php on line 673
Warning: Use of undefined constant classid - assumed 'classid' (this will throw an Error in a future version of PHP) in /data/www.zhuangjiba.com/web/e/class/connect.php on line 2418
Warning: Use of undefined constant wburl - assumed 'wburl' (this will throw an Error in a future version of PHP) in /data/www.zhuangjiba.com/web/e/class/connect.php on line 2418
Warning: Use of undefined constant classid - assumed 'classid' (this will throw an Error in a future version of PHP) in /data/www.zhuangjiba.com/web/e/class/connect.php on line 2423
Warning: Use of undefined constant listdt - assumed 'listdt' (this will throw an Error in a future version of PHP) in /data/www.zhuangjiba.com/web/e/class/connect.php on line 2423
Warning: Use of undefined constant classid - assumed 'classid' (this will throw an Error in a future version of PHP) in /data/www.zhuangjiba.com/web/e/class/connect.php on line 2428
Warning: Use of undefined constant classurl - assumed 'classurl' (this will throw an Error in a future version of PHP) in /data/www.zhuangjiba.com/web/e/class/connect.php on line 2428
Warning: Use of undefined constant newsurl - assumed 'newsurl' (this will throw an Error in a future version of PHP) in /data/www.zhuangjiba.com/web/e/class/connect.php on line 2434
Warning: Use of undefined constant classid - assumed 'classid' (this will throw an Error in a future version of PHP) in /data/www.zhuangjiba.com/web/e/class/connect.php on line 2434
Warning: Use of undefined constant classpath - assumed 'classpath' (this will throw an Error in a future version of PHP) in /data/www.zhuangjiba.com/web/e/class/connect.php on line 2434
Warning: Use of undefined constant classid - assumed 'classid' (this will throw an Error in a future version of PHP) in /data/www.zhuangjiba.com/web/e/class/connect.php on line 2436
Warning: Use of undefined constant bname - assumed 'bname' (this will throw an Error in a future version of PHP) in /data/www.zhuangjiba.com/web/e/class/connect.php on line 2436
Warning: Use of undefined constant classid - assumed 'classid' (this will throw an Error in a future version of PHP) in /data/www.zhuangjiba.com/web/e/class/connect.php on line 2439
Warning: Use of undefined constant bname - assumed 'bname' (this will throw an Error in a future version of PHP) in /data/www.zhuangjiba.com/web/e/class/connect.php on line 2439
- 升级win11检测提示不通过?快速解决方案.. 2024-10-13 Warning: Use of undefined constant classid - assumed 'classid' (this will throw an Error in a future version of PHP) in /data/www.zhuangjiba.com/web/e/class/t_functions.php on line 673 Warning: Use of undefined constant bname - assumed 'bname' (this will throw an Error in a future version of PHP) in /data/www.zhuangjiba.com/web/e/class/t_functions.php on line 673 Warning: Use of undefined constant classid - assumed 'classid' (this will throw an Error in a future version of PHP) in /data/www.zhuangjiba.com/web/e/class/t_functions.php on line 673 Warning: Use of undefined constant bname - assumed 'bname' (this will throw an Error in a future version of PHP) in /data/www.zhuangjiba.com/web/e/class/t_functions.php on line 673 Warning: Use of undefined constant classid - assumed 'classid' (this will throw an Error in a future version of PHP) in /data/www.zhuangjiba.com/web/e/class/connect.php on line 2418 Warning: Use of undefined constant wburl - assumed 'wburl' (this will throw an Error in a future version of PHP) in /data/www.zhuangjiba.com/web/e/class/connect.php on line 2418 Warning: Use of undefined constant classid - assumed 'classid' (this will throw an Error in a future version of PHP) in /data/www.zhuangjiba.com/web/e/class/connect.php on line 2423 Warning: Use of undefined constant listdt - assumed 'listdt' (this will throw an Error in a future version of PHP) in /data/www.zhuangjiba.com/web/e/class/connect.php on line 2423 Warning: Use of undefined constant classid - assumed 'classid' (this will throw an Error in a future version of PHP) in /data/www.zhuangjiba.com/web/e/class/connect.php on line 2428 Warning: Use of undefined constant classurl - assumed 'classurl' (this will throw an Error in a future version of PHP) in /data/www.zhuangjiba.com/web/e/class/connect.php on line 2428 Warning: Use of undefined constant newsurl - assumed 'newsurl' (this will throw an Error in a future version of PHP) in /data/www.zhuangjiba.com/web/e/class/connect.php on line 2434 Warning: Use of undefined constant classid - assumed 'classid' (this will throw an Error in a future version of PHP) in /data/www.zhuangjiba.com/web/e/class/connect.php on line 2434 Warning: Use of undefined constant classpath - assumed 'classpath' (this will throw an Error in a future version of PHP) in /data/www.zhuangjiba.com/web/e/class/connect.php on line 2434 Warning: Use of undefined constant classid - assumed 'classid' (this will throw an Error in a future version of PHP) in /data/www.zhuangjiba.com/web/e/class/connect.php on line 2436 Warning: Use of undefined constant bname - assumed 'bname' (this will throw an Error in a future version of PHP) in /data/www.zhuangjiba.com/web/e/class/connect.php on line 2436 Warning: Use of undefined constant classid - assumed 'classid' (this will throw an Error in a future version of PHP) in /data/www.zhuangjiba.com/web/e/class/connect.php on line 2439 Warning: Use of undefined constant bname - assumed 'bname' (this will throw an Error in a future version of PHP) in /data/www.zhuangjiba.com/web/e/class/connect.php on line 2439
- win11wifi找不到wifi网络怎么办.. 2022-02-01 Warning: Use of undefined constant classid - assumed 'classid' (this will throw an Error in a future version of PHP) in /data/www.zhuangjiba.com/web/e/class/t_functions.php on line 673 Warning: Use of undefined constant bname - assumed 'bname' (this will throw an Error in a future version of PHP) in /data/www.zhuangjiba.com/web/e/class/t_functions.php on line 673 Warning: Use of undefined constant classid - assumed 'classid' (this will throw an Error in a future version of PHP) in /data/www.zhuangjiba.com/web/e/class/t_functions.php on line 673 Warning: Use of undefined constant bname - assumed 'bname' (this will throw an Error in a future version of PHP) in /data/www.zhuangjiba.com/web/e/class/t_functions.php on line 673 Warning: Use of undefined constant classid - assumed 'classid' (this will throw an Error in a future version of PHP) in /data/www.zhuangjiba.com/web/e/class/connect.php on line 2418 Warning: Use of undefined constant wburl - assumed 'wburl' (this will throw an Error in a future version of PHP) in /data/www.zhuangjiba.com/web/e/class/connect.php on line 2418 Warning: Use of undefined constant classid - assumed 'classid' (this will throw an Error in a future version of PHP) in /data/www.zhuangjiba.com/web/e/class/connect.php on line 2423 Warning: Use of undefined constant listdt - assumed 'listdt' (this will throw an Error in a future version of PHP) in /data/www.zhuangjiba.com/web/e/class/connect.php on line 2423 Warning: Use of undefined constant classid - assumed 'classid' (this will throw an Error in a future version of PHP) in /data/www.zhuangjiba.com/web/e/class/connect.php on line 2428 Warning: Use of undefined constant classurl - assumed 'classurl' (this will throw an Error in a future version of PHP) in /data/www.zhuangjiba.com/web/e/class/connect.php on line 2428 Warning: Use of undefined constant newsurl - assumed 'newsurl' (this will throw an Error in a future version of PHP) in /data/www.zhuangjiba.com/web/e/class/connect.php on line 2434 Warning: Use of undefined constant classid - assumed 'classid' (this will throw an Error in a future version of PHP) in /data/www.zhuangjiba.com/web/e/class/connect.php on line 2434 Warning: Use of undefined constant classpath - assumed 'classpath' (this will throw an Error in a future version of PHP) in /data/www.zhuangjiba.com/web/e/class/connect.php on line 2434 Warning: Use of undefined constant classid - assumed 'classid' (this will throw an Error in a future version of PHP) in /data/www.zhuangjiba.com/web/e/class/connect.php on line 2436 Warning: Use of undefined constant bname - assumed 'bname' (this will throw an Error in a future version of PHP) in /data/www.zhuangjiba.com/web/e/class/connect.php on line 2436 Warning: Use of undefined constant classid - assumed 'classid' (this will throw an Error in a future version of PHP) in /data/www.zhuangjiba.com/web/e/class/connect.php on line 2439 Warning: Use of undefined constant bname - assumed 'bname' (this will throw an Error in a future version of PHP) in /data/www.zhuangjiba.com/web/e/class/connect.php on line 2439
- Windows11任务栏bug出现死机没反应怎.. 2022-02-19 Warning: Use of undefined constant classid - assumed 'classid' (this will throw an Error in a future version of PHP) in /data/www.zhuangjiba.com/web/e/class/t_functions.php on line 673 Warning: Use of undefined constant bname - assumed 'bname' (this will throw an Error in a future version of PHP) in /data/www.zhuangjiba.com/web/e/class/t_functions.php on line 673 Warning: Use of undefined constant classid - assumed 'classid' (this will throw an Error in a future version of PHP) in /data/www.zhuangjiba.com/web/e/class/t_functions.php on line 673 Warning: Use of undefined constant bname - assumed 'bname' (this will throw an Error in a future version of PHP) in /data/www.zhuangjiba.com/web/e/class/t_functions.php on line 673 Warning: Use of undefined constant classid - assumed 'classid' (this will throw an Error in a future version of PHP) in /data/www.zhuangjiba.com/web/e/class/connect.php on line 2418 Warning: Use of undefined constant wburl - assumed 'wburl' (this will throw an Error in a future version of PHP) in /data/www.zhuangjiba.com/web/e/class/connect.php on line 2418 Warning: Use of undefined constant classid - assumed 'classid' (this will throw an Error in a future version of PHP) in /data/www.zhuangjiba.com/web/e/class/connect.php on line 2423 Warning: Use of undefined constant listdt - assumed 'listdt' (this will throw an Error in a future version of PHP) in /data/www.zhuangjiba.com/web/e/class/connect.php on line 2423 Warning: Use of undefined constant classid - assumed 'classid' (this will throw an Error in a future version of PHP) in /data/www.zhuangjiba.com/web/e/class/connect.php on line 2428 Warning: Use of undefined constant classurl - assumed 'classurl' (this will throw an Error in a future version of PHP) in /data/www.zhuangjiba.com/web/e/class/connect.php on line 2428 Warning: Use of undefined constant newsurl - assumed 'newsurl' (this will throw an Error in a future version of PHP) in /data/www.zhuangjiba.com/web/e/class/connect.php on line 2434 Warning: Use of undefined constant classid - assumed 'classid' (this will throw an Error in a future version of PHP) in /data/www.zhuangjiba.com/web/e/class/connect.php on line 2434 Warning: Use of undefined constant classpath - assumed 'classpath' (this will throw an Error in a future version of PHP) in /data/www.zhuangjiba.com/web/e/class/connect.php on line 2434 Warning: Use of undefined constant classid - assumed 'classid' (this will throw an Error in a future version of PHP) in /data/www.zhuangjiba.com/web/e/class/connect.php on line 2436 Warning: Use of undefined constant bname - assumed 'bname' (this will throw an Error in a future version of PHP) in /data/www.zhuangjiba.com/web/e/class/connect.php on line 2436 Warning: Use of undefined constant classid - assumed 'classid' (this will throw an Error in a future version of PHP) in /data/www.zhuangjiba.com/web/e/class/connect.php on line 2439 Warning: Use of undefined constant bname - assumed 'bname' (this will throw an Error in a future version of PHP) in /data/www.zhuangjiba.com/web/e/class/connect.php on line 2439
- 教你win11系统更新怎么关闭 2021-09-03 Warning: Use of undefined constant classid - assumed 'classid' (this will throw an Error in a future version of PHP) in /data/www.zhuangjiba.com/web/e/class/t_functions.php on line 673 Warning: Use of undefined constant bname - assumed 'bname' (this will throw an Error in a future version of PHP) in /data/www.zhuangjiba.com/web/e/class/t_functions.php on line 673 Warning: Use of undefined constant classid - assumed 'classid' (this will throw an Error in a future version of PHP) in /data/www.zhuangjiba.com/web/e/class/t_functions.php on line 673 Warning: Use of undefined constant bname - assumed 'bname' (this will throw an Error in a future version of PHP) in /data/www.zhuangjiba.com/web/e/class/t_functions.php on line 673 Warning: Use of undefined constant classid - assumed 'classid' (this will throw an Error in a future version of PHP) in /data/www.zhuangjiba.com/web/e/class/connect.php on line 2418 Warning: Use of undefined constant wburl - assumed 'wburl' (this will throw an Error in a future version of PHP) in /data/www.zhuangjiba.com/web/e/class/connect.php on line 2418 Warning: Use of undefined constant classid - assumed 'classid' (this will throw an Error in a future version of PHP) in /data/www.zhuangjiba.com/web/e/class/connect.php on line 2423 Warning: Use of undefined constant listdt - assumed 'listdt' (this will throw an Error in a future version of PHP) in /data/www.zhuangjiba.com/web/e/class/connect.php on line 2423 Warning: Use of undefined constant classid - assumed 'classid' (this will throw an Error in a future version of PHP) in /data/www.zhuangjiba.com/web/e/class/connect.php on line 2428 Warning: Use of undefined constant classurl - assumed 'classurl' (this will throw an Error in a future version of PHP) in /data/www.zhuangjiba.com/web/e/class/connect.php on line 2428 Warning: Use of undefined constant newsurl - assumed 'newsurl' (this will throw an Error in a future version of PHP) in /data/www.zhuangjiba.com/web/e/class/connect.php on line 2434 Warning: Use of undefined constant classid - assumed 'classid' (this will throw an Error in a future version of PHP) in /data/www.zhuangjiba.com/web/e/class/connect.php on line 2434 Warning: Use of undefined constant classpath - assumed 'classpath' (this will throw an Error in a future version of PHP) in /data/www.zhuangjiba.com/web/e/class/connect.php on line 2434 Warning: Use of undefined constant classid - assumed 'classid' (this will throw an Error in a future version of PHP) in /data/www.zhuangjiba.com/web/e/class/connect.php on line 2436 Warning: Use of undefined constant bname - assumed 'bname' (this will throw an Error in a future version of PHP) in /data/www.zhuangjiba.com/web/e/class/connect.php on line 2436 Warning: Use of undefined constant classid - assumed 'classid' (this will throw an Error in a future version of PHP) in /data/www.zhuangjiba.com/web/e/class/connect.php on line 2439 Warning: Use of undefined constant bname - assumed 'bname' (this will throw an Error in a future version of PHP) in /data/www.zhuangjiba.com/web/e/class/connect.php on line 2439
- 升级为win11好吗?解析优缺点,助你做出明.. 2024-10-11 Warning: Use of undefined constant classid - assumed 'classid' (this will throw an Error in a future version of PHP) in /data/www.zhuangjiba.com/web/e/class/t_functions.php on line 673 Warning: Use of undefined constant bname - assumed 'bname' (this will throw an Error in a future version of PHP) in /data/www.zhuangjiba.com/web/e/class/t_functions.php on line 673 Warning: Use of undefined constant classid - assumed 'classid' (this will throw an Error in a future version of PHP) in /data/www.zhuangjiba.com/web/e/class/t_functions.php on line 673 Warning: Use of undefined constant bname - assumed 'bname' (this will throw an Error in a future version of PHP) in /data/www.zhuangjiba.com/web/e/class/t_functions.php on line 673 Warning: Use of undefined constant classid - assumed 'classid' (this will throw an Error in a future version of PHP) in /data/www.zhuangjiba.com/web/e/class/connect.php on line 2418 Warning: Use of undefined constant wburl - assumed 'wburl' (this will throw an Error in a future version of PHP) in /data/www.zhuangjiba.com/web/e/class/connect.php on line 2418 Warning: Use of undefined constant classid - assumed 'classid' (this will throw an Error in a future version of PHP) in /data/www.zhuangjiba.com/web/e/class/connect.php on line 2423 Warning: Use of undefined constant listdt - assumed 'listdt' (this will throw an Error in a future version of PHP) in /data/www.zhuangjiba.com/web/e/class/connect.php on line 2423 Warning: Use of undefined constant classid - assumed 'classid' (this will throw an Error in a future version of PHP) in /data/www.zhuangjiba.com/web/e/class/connect.php on line 2428 Warning: Use of undefined constant classurl - assumed 'classurl' (this will throw an Error in a future version of PHP) in /data/www.zhuangjiba.com/web/e/class/connect.php on line 2428 Warning: Use of undefined constant newsurl - assumed 'newsurl' (this will throw an Error in a future version of PHP) in /data/www.zhuangjiba.com/web/e/class/connect.php on line 2434 Warning: Use of undefined constant classid - assumed 'classid' (this will throw an Error in a future version of PHP) in /data/www.zhuangjiba.com/web/e/class/connect.php on line 2434 Warning: Use of undefined constant classpath - assumed 'classpath' (this will throw an Error in a future version of PHP) in /data/www.zhuangjiba.com/web/e/class/connect.php on line 2434 Warning: Use of undefined constant classid - assumed 'classid' (this will throw an Error in a future version of PHP) in /data/www.zhuangjiba.com/web/e/class/connect.php on line 2436 Warning: Use of undefined constant bname - assumed 'bname' (this will throw an Error in a future version of PHP) in /data/www.zhuangjiba.com/web/e/class/connect.php on line 2436 Warning: Use of undefined constant classid - assumed 'classid' (this will throw an Error in a future version of PHP) in /data/www.zhuangjiba.com/web/e/class/connect.php on line 2439 Warning: Use of undefined constant bname - assumed 'bname' (this will throw an Error in a future version of PHP) in /data/www.zhuangjiba.com/web/e/class/connect.php on line 2439
- win11错误安装过程发生故障 2021-09-16


